Text-to-Join Keywords: How to Grow Your SMS List from Anywhere
Get a 14-day free trial of Salesmsg.
.png)


Problem: You need more SMS leads or don’t have a texting list yet.
You need more SMS leads—but how do you get people to join your list from anywhere?
- Not everyone fills out web forms.
- Social media engagement doesn’t always translate to SMS opt-ins.
- Live event leads often slip away without proper follow-up.
Without an easy, frictionless way to grow your SMS list, you’re leaving potential leads behind.
Solution: Grow your texting list from anywhere with text-to-join keywords.
Set up a Text-to-Join Keyword inside Salesmsg. You can also create a follow-up workflow inside HubSpot if you wish.
With Text-to-Join, you make it effortless for people to opt into your SMS list from anywhere.
Whether your SMS leads are sitting at a conference, commenting on Instagram, watching a TikTok video or interacting with your brand in real time, it’s easy to ask them to opt-in.
Why a Text-to-Join keyword?
✔ Works anywhere – Use it on social media, in emails, on your website, or at live events.
✔ Simplifies opt-ins – No forms, no clicks—just text a keyword to join.
✔ Segments leads automatically – Tag subscribers based on how they joined.
✔ Unlimited possibilities – Set up as many text-to-join keywords as you like inside Salesmsg.
Sample Text-to-Join keywords:

- For social media: “Text ‘JOIN’ to XXX-XXX-XXXXto get exclusive updates.”
- For webinars: “Text ‘RSVP’ to XXXXXX to register for our live online training.”
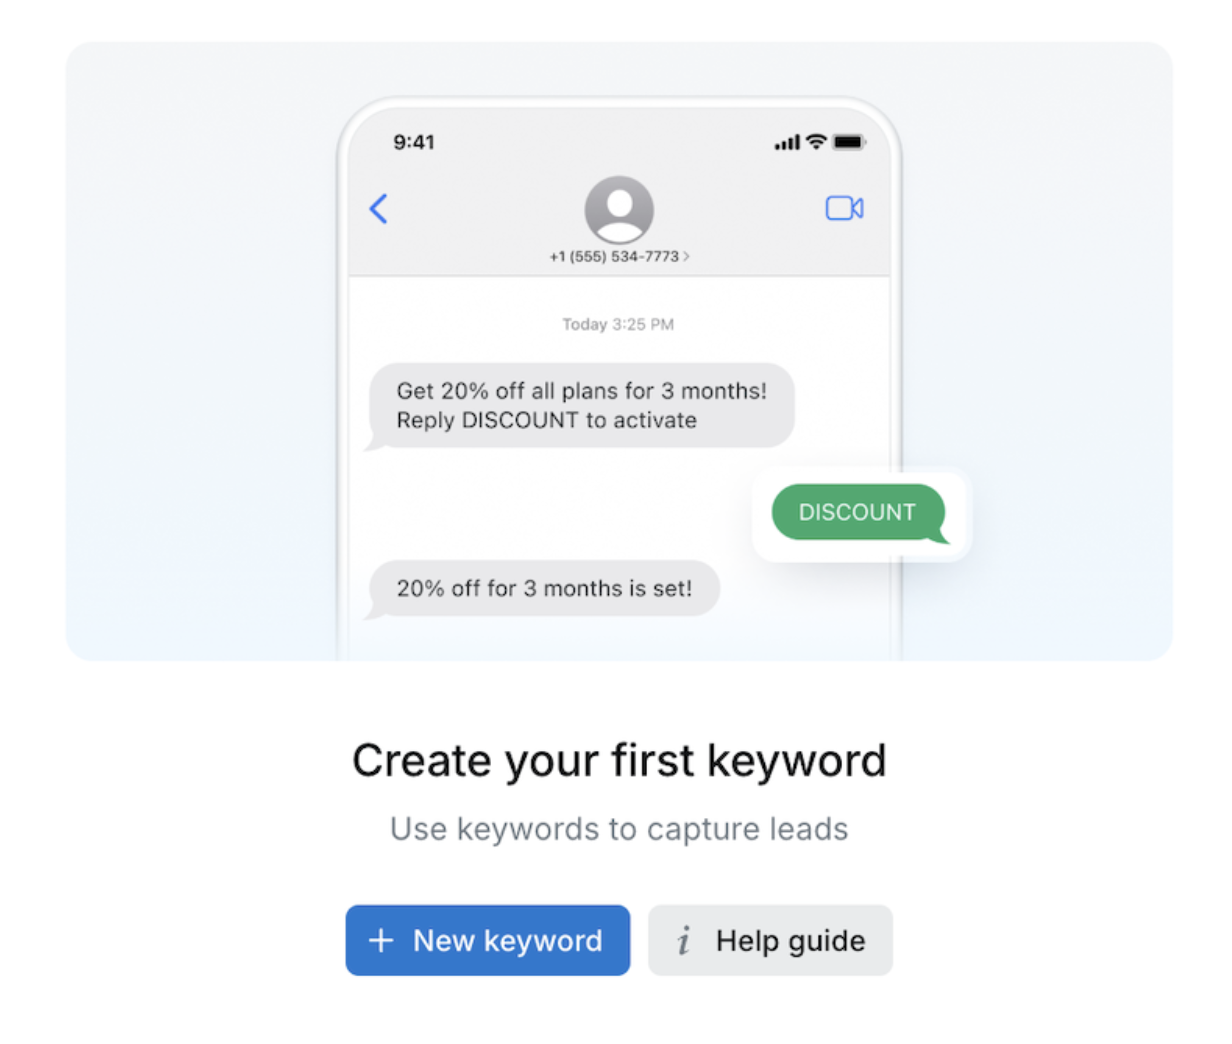
- For promotions: “Want a special offer? Text ‘DEMO’ to get a free trial link.”
One more reason to love Text-to-Join keywords:
✔ New Upgrades – At Salesmsg, we just introduced a new keywords page that makes it easier than ever to create and automate your text-to-join keywords.
How to Create a Text-to-Join Keyword + HubSpot Workflow
Before You Start:
Pre-work #1: Connect your Salesmsg account to your HubSpot account.
Go to Settings > App Marketplace and click to connect your HubSpot account. Then once you press connect, it will redirect you to your HubSpot account where you can connect your HubSpot account or create a new one.

For more details on configuring your HubSpot settings and syncing your contacts, read this article first.
Pre-work #2: Always use compliance language for text-to-join keywords.
Planning to use text-to-join keywords to grow your SMS list on your website, blog, social media, flyers, or other print materials?
Be sure to include the proper compliance language in your website pages, posts, or other print materials. This ensures you have explicit permission to text new leads and stay compliant. Here’s an example of the compliance language to use:
"I agree to receive recurring automated marketing text messages at the phone number provided. Msg & data rates may apply. Msg frequency varies. Reply HELP for help and STOP to cancel.
Privacy policy: www.mydomain.com/privacypolicy
Terms & conditions: www.mydomain.com/termsandconditions

Notice: This social media post from Salesmsg includes all the compliance language—including links to both the privacy policy and terms and conditions.
How to Set Up Your Text-to-Join Keyword Workflow
Step #1: Create a new Text-to-Join Keyword inside Salesmsg.
To get started, go to the keywords page:
Inside Salesmsg, click on AI & Automation in the sidebar, and then click on “keywords.”
First time visiting our keywords page?
You’ll see this box below. Click the blue button to create your new keyword.
Been to the keywords page before?
You’ll see this below. Click on the blue button in the upper righthand corner to create a new keyword.

How to create your keyword:
Your keyword is the actual word or phrase your leads will text to join your SMS list. Follow these steps to set it up on your keyword creation form:
- Choose your keyword – Select a word or phrase (SALE, DEAL, JOIN) that your leads will text to opt in. You can also add special characters like a hashtag for branding (#VIP).
- Add a description – Use an internal name to track and organize your keywords.
- Set an auto-reply – Write the text that leads will receive after texting your keyword.
- Select a phone number – Assign the Salesmsg-enabled number(s) for incoming keyword texts.
- Apply tags for segmentation – Automatically tag contacts based on how they joined (e.g., WebinarSMS, VIPList).
- Optional: Attach images, GIFs, or other media – Enhance your auto-reply text with images, videos, GIFs, PDFs, or audio. Click the ➕ attachment icon to access your Salesmsg Media Library.
- Filled in the keywords form? Press the blue “create” button to publish your keyword.

Follow-up step: Manage and track your keywords
You can activate or deactivate your keywords at any time inside your Salesmsg dashboard. You can also track keyword analytics directly in your dashboard.

Important note: You can stop here if you wish.
✔ At this point, you already have a keyword set up for your SMS leads.
✔ You are automatically sending a follow-up text through Salesmsg.
✔ If you tagged your new SMS leads, then they’ll flow into the proper list inside HubSpot.
That means you can simply stop this setup process here if you like.
However, we recommend setting up a HubSpot workflow to follow-up with these SMS leads further. For example, you may want to assign these new keyword SMS leads to a particular team member to follow-up in sales. Or add these leads to a static list.
For that, move into HubSpot to complete optional step #2.
Optional Step #2: Build a HubSpot workflow for your keyword.
Here's a glimpse at what you're building:
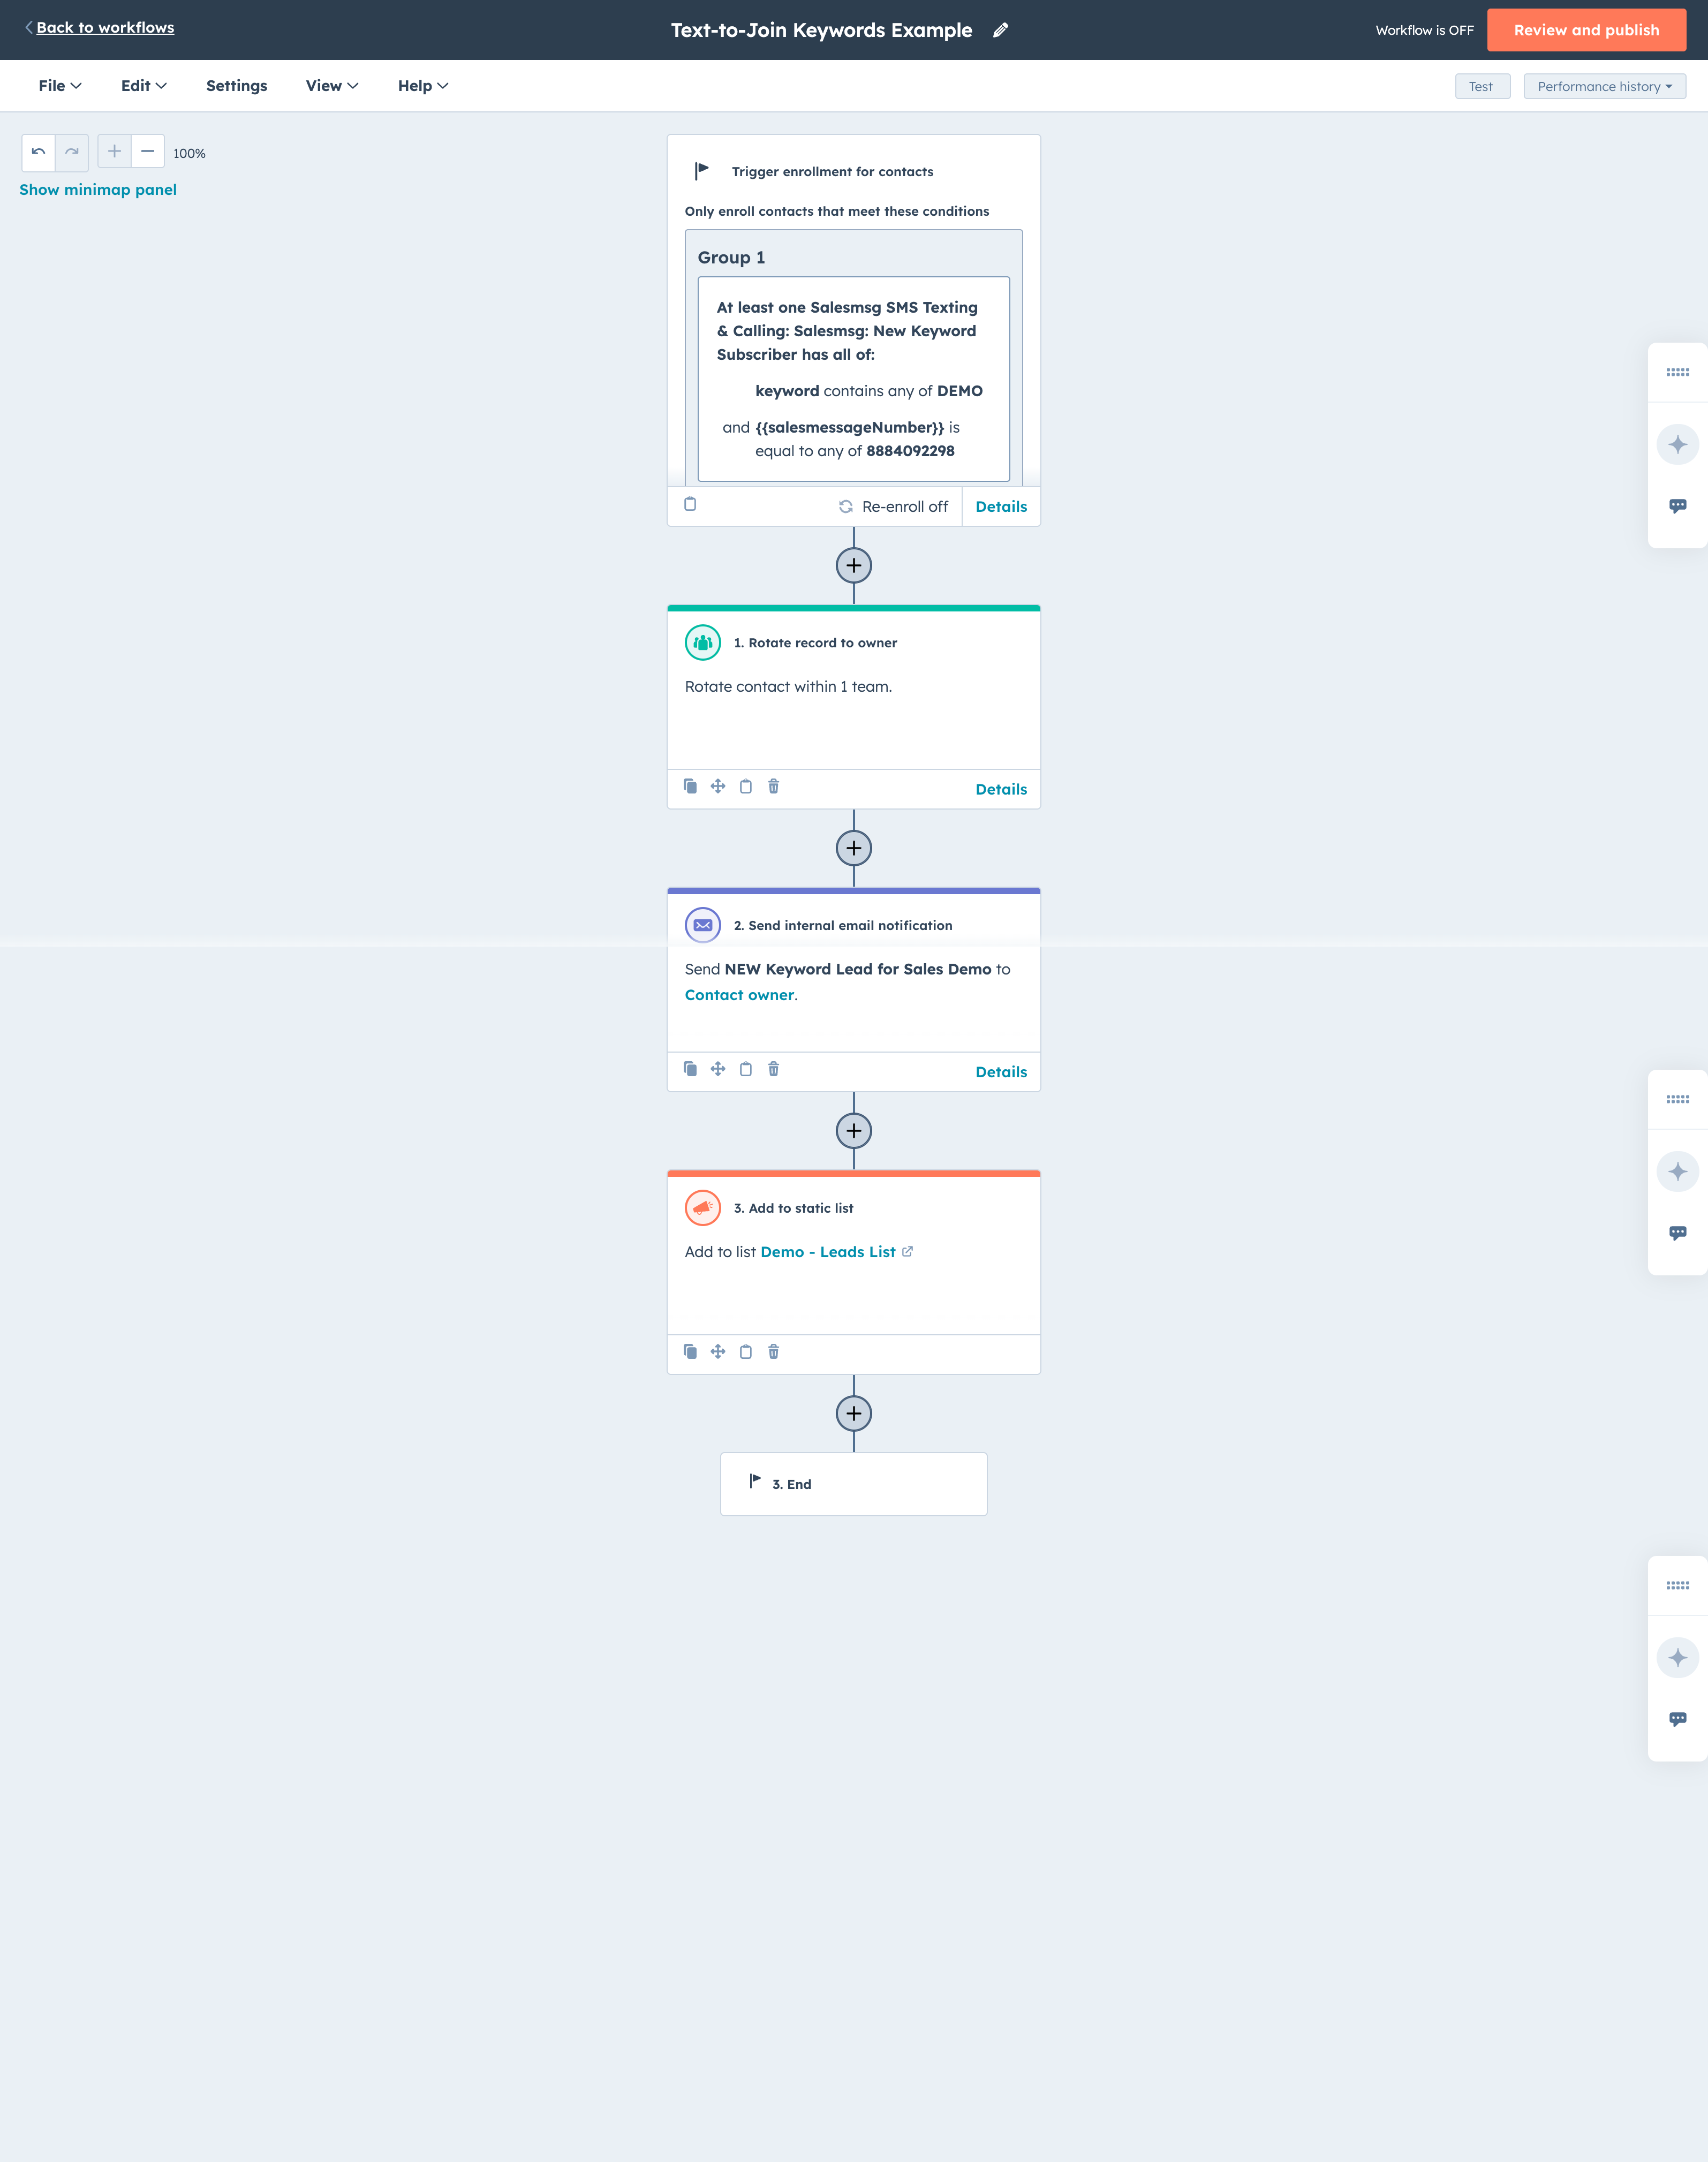
Create a contact-based workflow that triggers when new SMS leads text in your keyword.
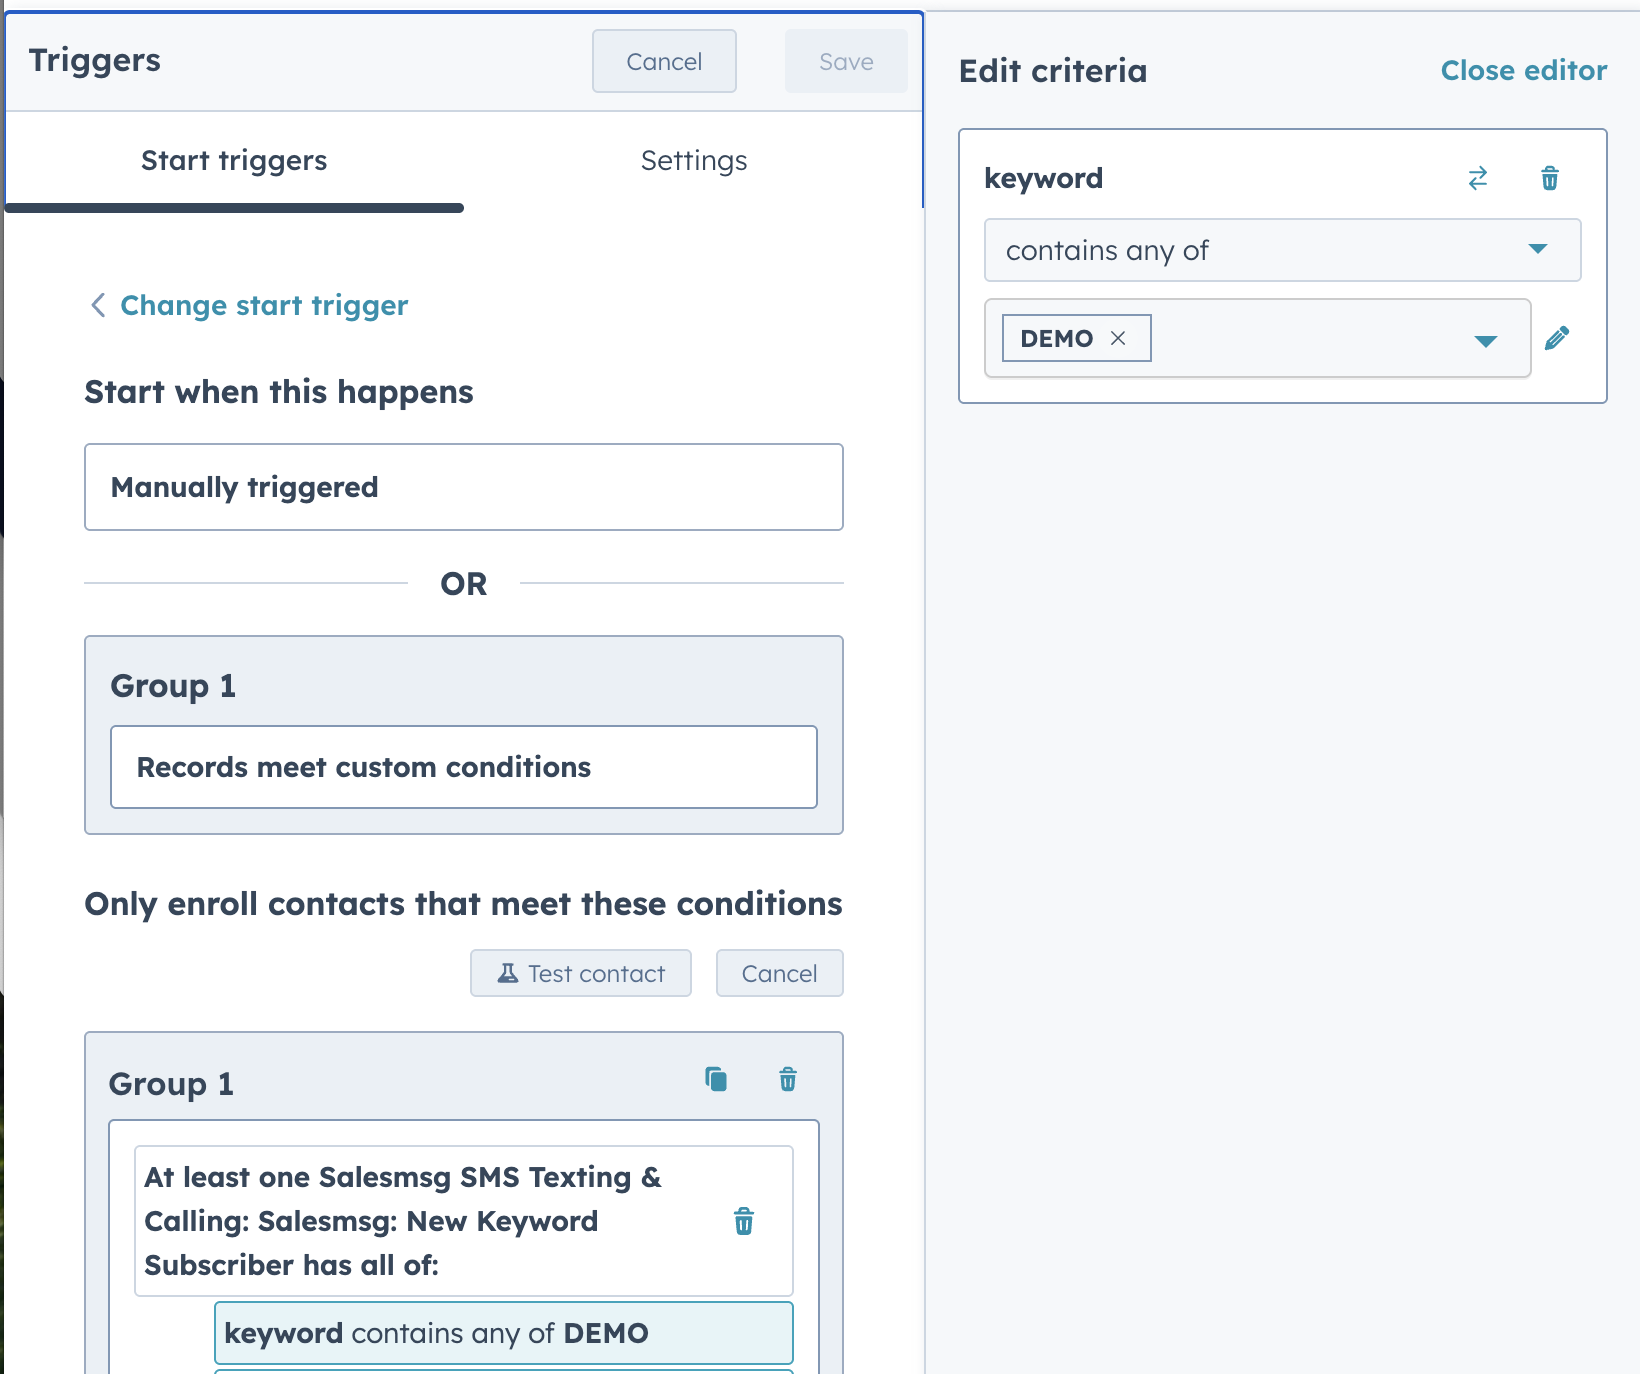
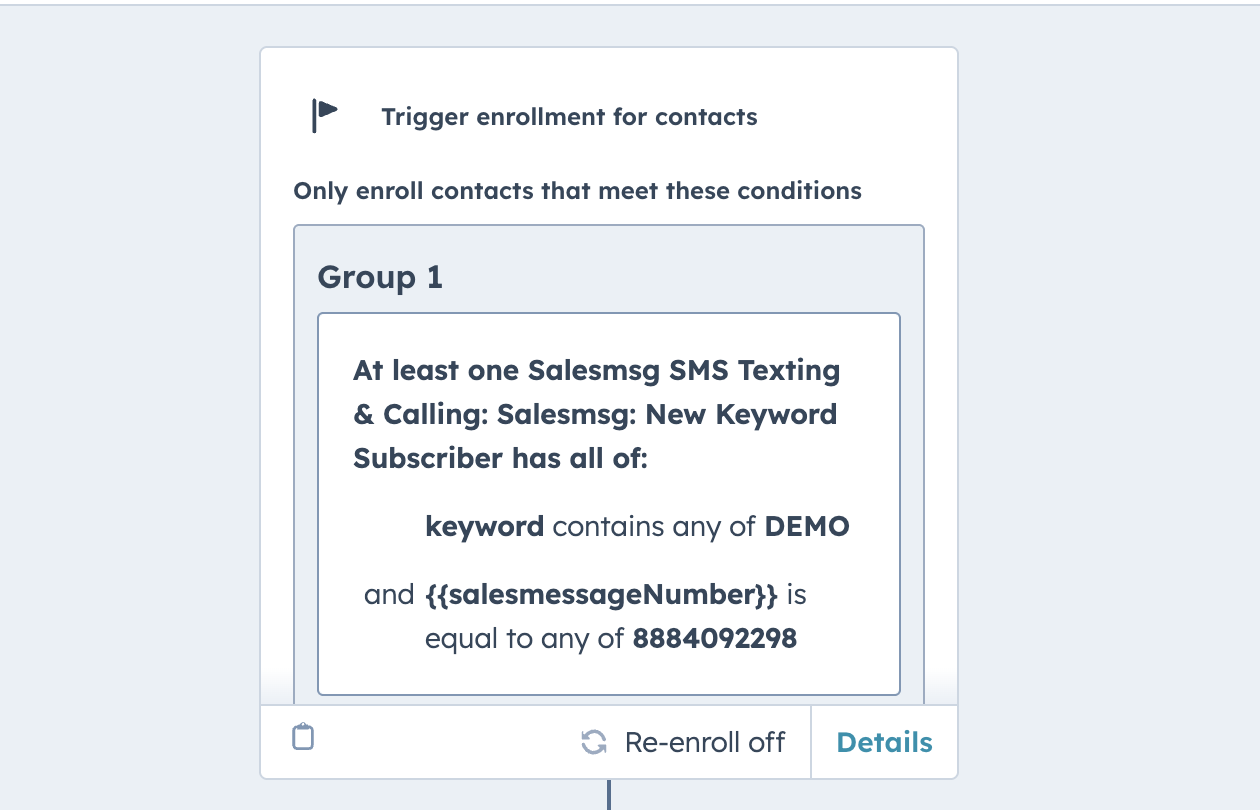
- Trigger enrollment into this workflow based on when filter criteria is met. Under “add criteria,” search for Salesmsg. Click on Salesmsg SMS Texting & Calling: Salesmsg: New Keyword Subscriber properties.

This will open a new menu. Choose “keyword.”

Type in your keyword that matches your new keyword inside Salesmsg. In our example, the keyword is “DEMO” to match Salesmsg’s social posts: “Text ‘DEMO’ to 1-888-409-2298” to get a demo of our Salesmsg platform.”
Under “Add criteria,” add the specific Salesmsg number your SMS leads are using to text in your keyword. To set this up, click “add criteria.” Choose “{{salemesageNumber}}.”
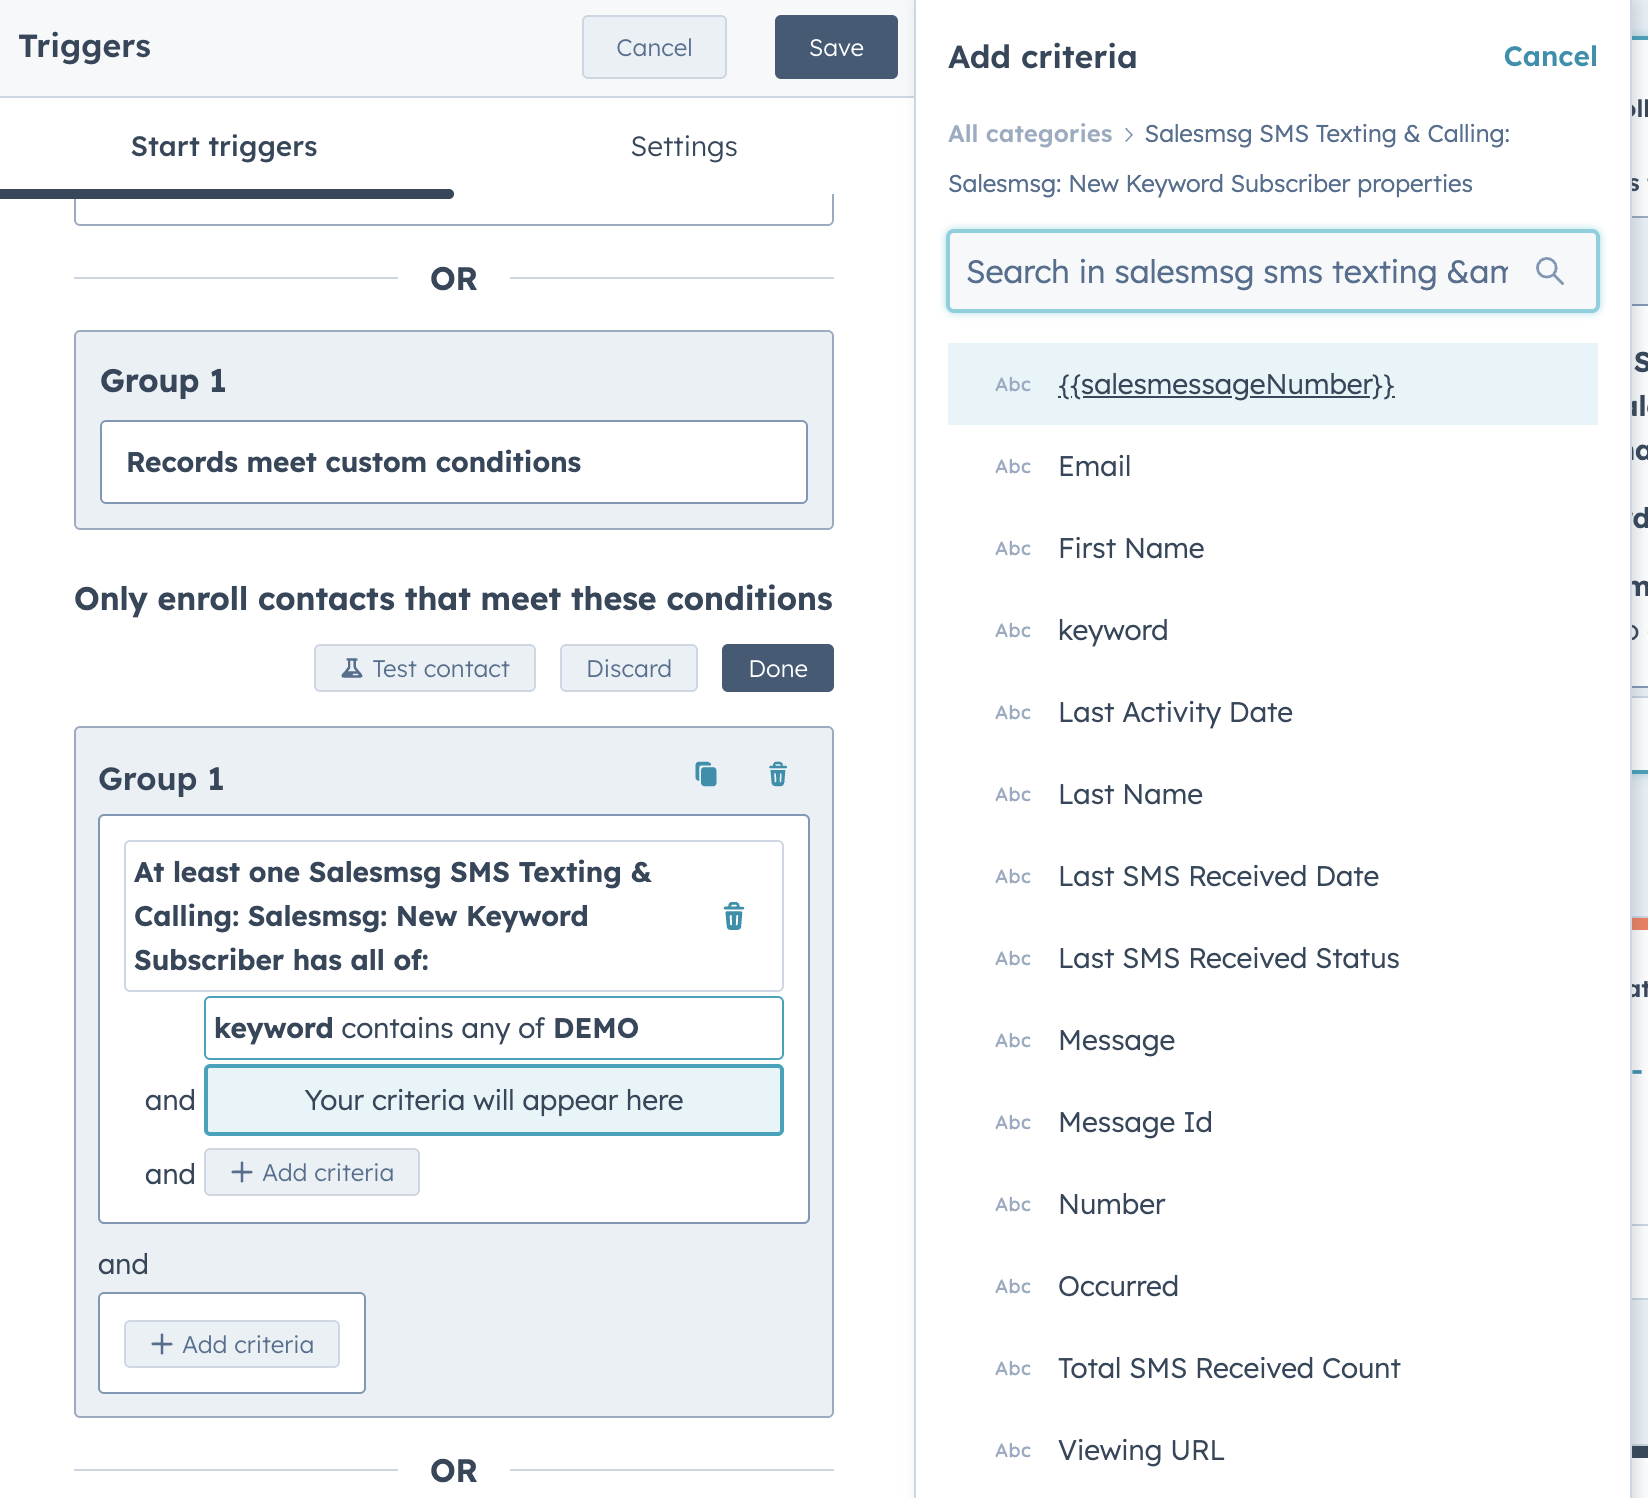
Type in the number you’re using for your text-to-join keyword.
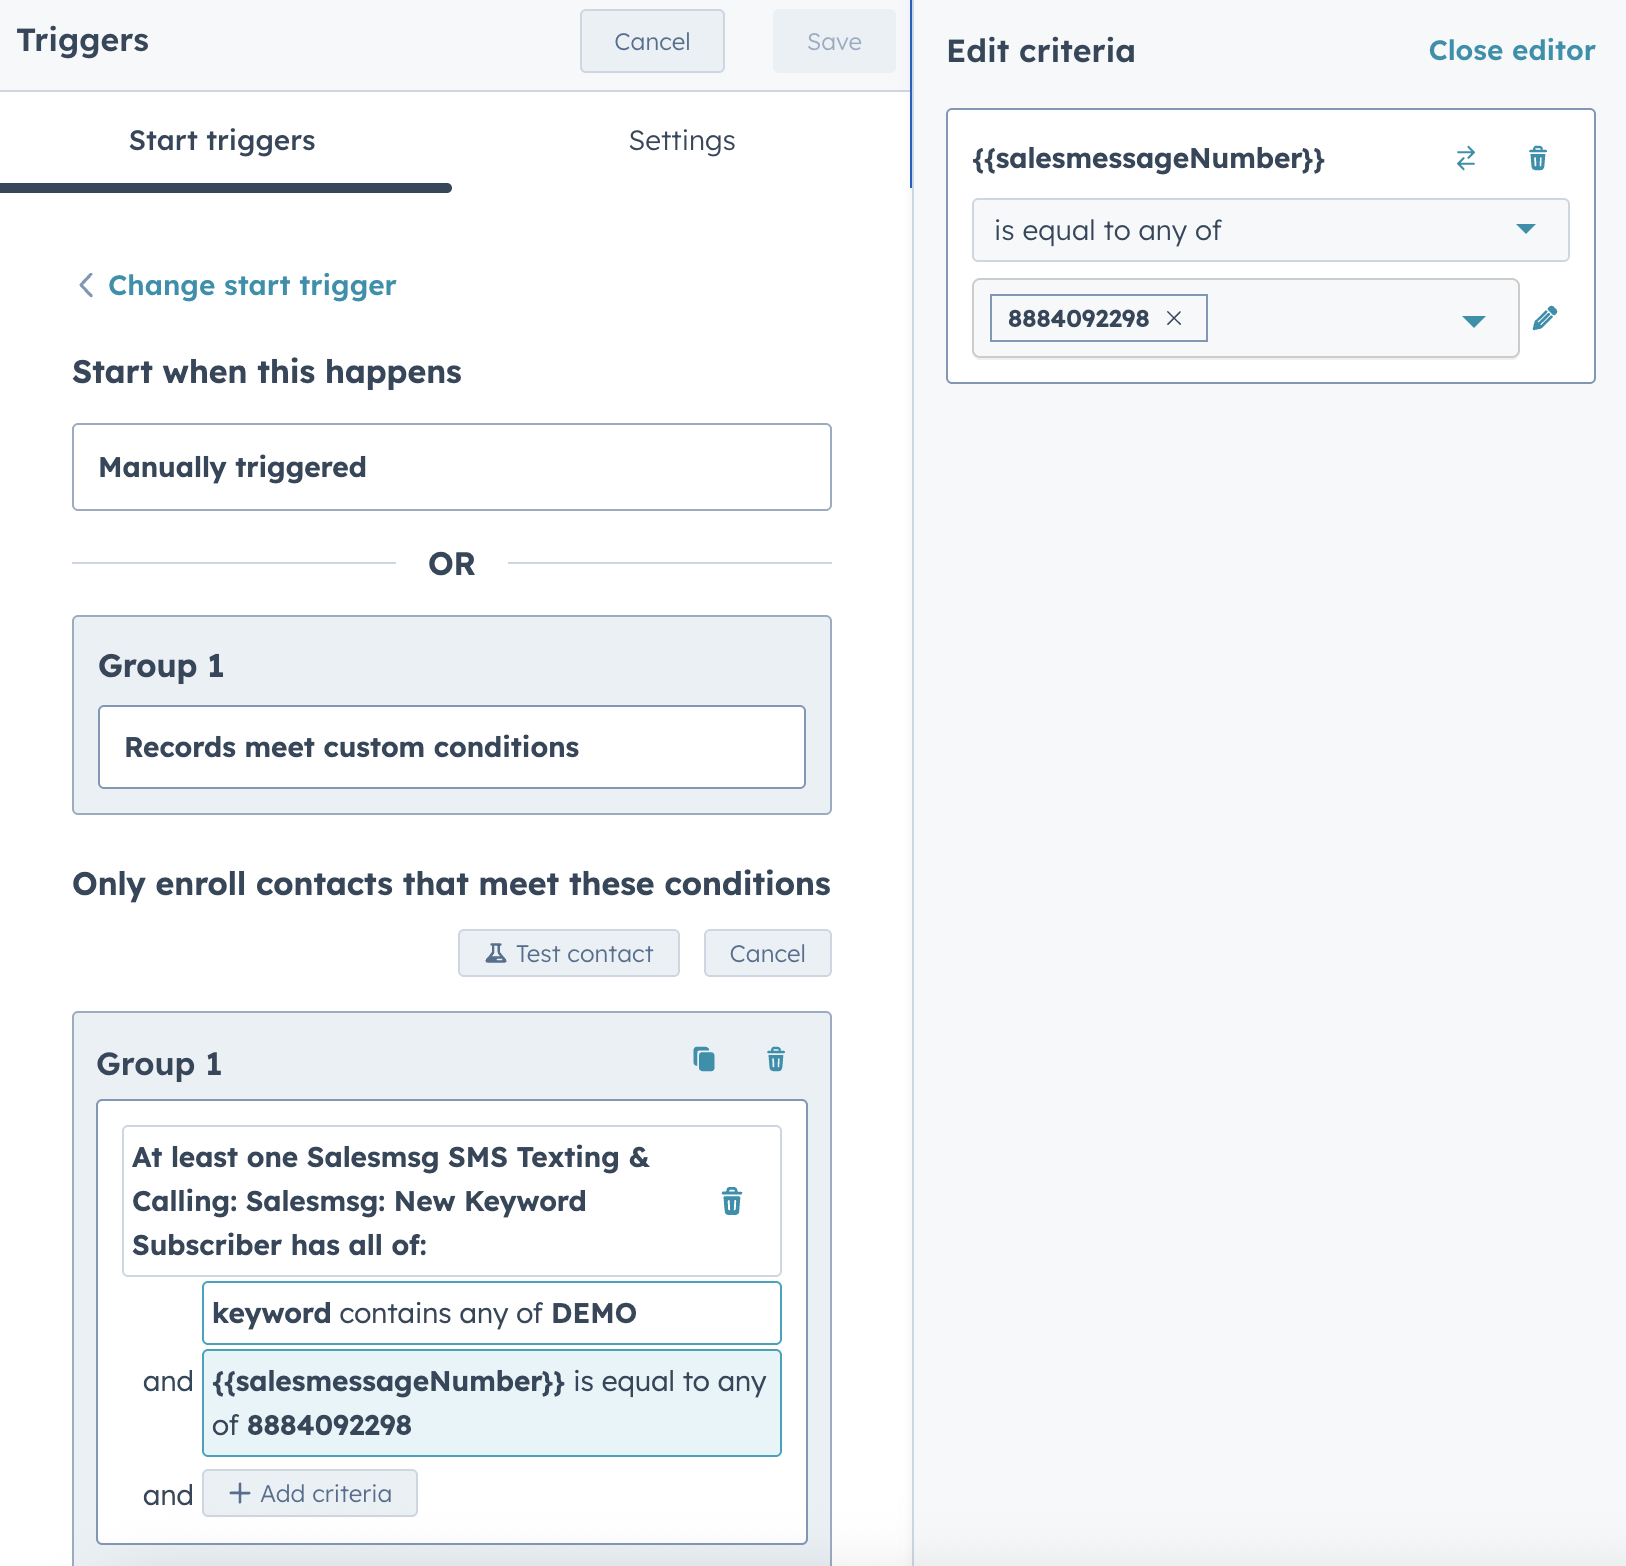
Your final trigger looks like this:
Best Practice - Rotate record to owner.
- You can assign a specific contact owner for all new text-to-join leads, or distribute them evenly among a team using round-robin assignment.
- To set this up, click the plus sign under your trigger. This opens your Choose an Action menu. In that menu, choose “rotate record to owner.”

Choose the member or team who will be assigned to handle these new text-to-join leads. In our example, we’re assigning these new “demo” leads to our United States team, so they can follow-up with these new text-to-join leads about a sales demo.

Best Practice - Send an internal message to your team about this lead.
- If you’re already assigning your new text-to-join leads to a specific contact owner, we suggest emailing that owner when a new lead joins your list.
- To set this up, click the plus sign under Rotate record to owner, to open the Choose an Action menu. In that menu, select “send internal email notification.”

Fill in all details to create this new internal email for your team.

Optional - Add your text-to-join leads to a static list.
- You can add new SMS leads to a static list for easy organization. For example, add your 'DEMO' leads to a sales team list, or 'SALE' leads to a follow-up list for last-minute texts before your sale ends.
- To set this up, click the plus sign under “Send internal email notification.” This opens the Choose an Action menu. Inside that menu, click on marketing > add to static list.

- Choose the static list for your new text-to-join SMS leds.

Looks good? Review and publish.
- That’s it for your workflow. Since Salesmsg already sent a reply text to these new SMS leads, there's no need to send another SMS through your workflow.
- Just need to review and publish.

Final Step: Market Your Text-to-Join Keyword
Now that your text-to-join keyword is set up, it’s time to put it to work.
Promote it across your website, blog, social media, email campaigns, print materials, and live events to grow your SMS list. The more places you share it, the more leads you’ll capture.
Reminder: Every time you promote your keyword—whether online or in print—include the required SMS compliance language. This ensures you have explicit permission to text new leads and stay compliant.

Why Text-to-Join Keywords Work
A great SMS list doesn’t build itself. Text-to-Join Keywords help you capture leads instantly—wherever they are.
✔ Faster than web forms – A simple text gets them on your list immediately.
✔ Higher engagement – If someone texts in, they’re an active, interested lead.
✔ Better follow-ups – HubSpot + Salesmsg lets you segment and automate next steps.
Ready to start growing your SMS list? https://www.salesmessage.com/features/text-to-join-keywords and set up your first Text-to-Join Keyword in minutes.
Related posts
.png)
.png)
.png)

Experience Seamless Business Texting & Calling
Get started today and see how Salesmsg can transform your business and bring you closer to your customers.


