Promotions, Launches, Campaigns: How to Use SMS to Drive More Sales
Get a 14-day free trial of Salesmsg.
.png)


Problem: Numbers are down for your promotions or marketing campaigns.
Your promotions aren’t hitting like they used to.
- Your email list is still growing—but open rates are down.
- Your ads are running—but they aren’t converting like before.
- Your best offers, promos and launches? They’re getting ignored.
The numbers are slipping, and you’re running out of ways to get your audience’s attention. The usual marketing channels just aren’t delivering the same results.
So what’s missing? Urgency. Visibility. Directness.
Solution: Add two texts to grab attention.
Add two text messages to your promotion—one at the beginning, and one at the end.
Texting gives your audience a clear, direct, and immediate way to engage with your offer—without relying on email algorithms or ad fatigue.
Use text messages at the two most critical times in your promotion:
- Day 1 - Launch Text: "The promo is live! Get this now before it’s gone: [link]."
- Final Day - Last-Chance Text: "Ends tonight! Last chance to grab [offer] before midnight: [link]."
Need proof? One Salesmsg customer added an extra $20,000 to their sales for one promotion, just by adding two text messages like this. See the case study here.
Now, let’s walk through how to add SMS to your promotion using Salesmsg + HubSpot.
Before You Start:
Pre-work #1: Connect your Salesmsg account to your HubSpot account.
Go to Settings > App Marketplace and click to connect your HubSpot account. Then once you press connect, it will redirect you to your HubSpot account where you can connect your HubSpot account or create a new one.
For more details on configuring your HubSpot settings and syncing your contacts, be sure to read this article first.
Already connected your Salesmsg account to HubSpot? Move on to step #1.
Pre-work #2: Collect SMS Opt-In Before Your Promo Starts
You must have explicit permission from your leads to send them text messages. We recommend you ask for leads’ permission on all opt-in forms before your promo begins.
On your opt-in forms:
- Ask for your leads’ phone number.
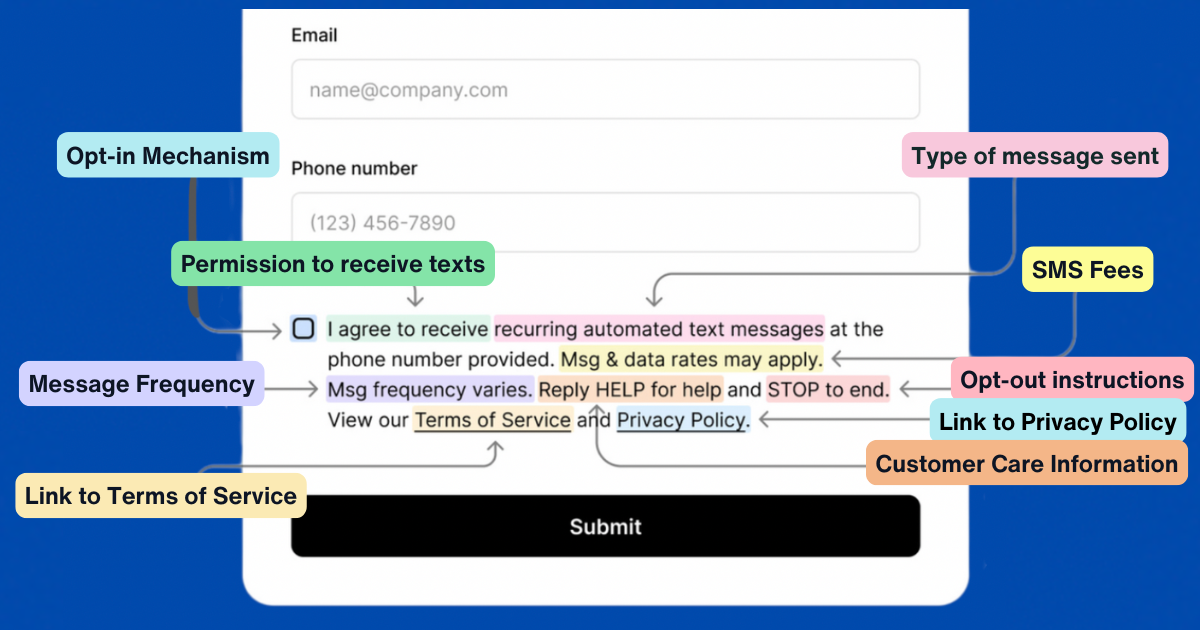
- Add an unchecked checkbox with the compliance language to ask for your leads’ permission to text them. Here’s an example of compliance language with all necessary items included, including links to both your Terms of Service and Privacy Policy:
- (Unchecked checkbox) “I agree to receive recurring automated text messages at the phone number provided. Msg & data rates may apply. Msg frequency varies. Reply HELP for help and STOP to end. View our Terms of Service and our Privacy Policy.”
- Ensure leads can submit each opt-in form, even if they don’t opt in for your text messages. In other words, allow leads to submit your opt-in forms without checking the checkbox you see below.
📌 Reference HubSpot’s SMS opt-in guide for compliant language: Read Here.
Important Note: To build this specific workflow, you should create your form inside HubSpot too.
Please keep in mind: There’s many ways to build a HubSpot workflow.
For this example, we’re going to show you how to build a workflow that checks if your webinar attendees opted in for text messages or not.
To add this functionality to your workflow, you can build a custom property inside HubSpot that’s connected to your HubSpot opt-in form. This property will specifically check if your webinar attendees checked this box that says “I agree to receive text messages…”
To create this form, go to forms inside HubSpot. Create a form that asks for your webinar registrant’s first name, email and phone number. Add a single checkbox to your form that will ask your attendees to opt-in for texts. Drop in the exact opt-in message you see above that starts with “I agree to receive recurring automated marketing text messages…”
On the form, create a new connected property. Give it a name like “opt-in” or “Salesmsg opt-in.” Then you can use this connected property in your workflow.

📌 Done? You’re ready to build your workflow.
How to Add Text Messages to a Promo
Here's a look at the completed promo workflow you're building inside HubSpot...

Now let's talk about how to build this...
Step #1: Trigger this workflow when new leads join your list.
You can trigger this workflow when new leads are enrolled in your list in the days and weeks leading up to your promo.

Step #2: Add a delay until Day #1 of your promo.
Your workflow should not begin until the morning of Day #1 of your promo. (In our example, that’s Tuesday at 9 AM for a 4-day promo.)

Step #3: Create Branch Logic in HubSpot
- Add an And/Or Branch based on whether your contacts opted-in for text messages.
- Those who opted in get both email and text (or SMS) reminders.
- Those who didn’t opt in receive email-only reminders.
- To create this SMS-only branch, click on “add criteria.” Then “contact properties.” Then search for the name of your custom property (like “SMS opt-in.”) From there, mark the criteria as “yes” as we did below.

- When you’re done, you’ll create a branch that looks like this:

Step #4: For leads who did NOT opt-in for SMS, send only emails.
✅ Add emails 1-4 to branch 2 of your workflow.
Email 1 – Promo Kickoff (Day 1, AM)
- Announces the promo and explains the offer.
Email 2 – Mid-Promo Reminder (Day 3, AM)
- Reminds them of the offer and highlights urgency.
Email 3 – Last Day 1 (Day 4, AM)
- Reiterates the offer and urgency.
Email 4 – Last Day 2 (Day 4, PM)
- Gives customers one last chance to buy.
- Send it around noon on the last day.
✅ Add delays into branch 1 of your workflow between each email.
- Add a delay between Email 1 and Email 2 until morning of Day 3.
- Add a delay between Email 2 and Email 3 until the morning of Day 4.
- Add a delay between Email 3 and Email 4 until noon of Day 4.

For leads who did opt-in for SMS, send both SMS messages + emails.
✅ Add SMS 1 to branch 1 of your workflow – Send the Launch Text to announce the promotion.
How to add this text message to your workflow:
- Inside your workflow, click the plus sign under the SMS branch. This will open your “Choose an Action” menu.
- On the “Choose an Action” menu, scroll down to Salesmsg SMS Texting & Calling. Open that menu.
- Click “Send SMS/MMS - Text Message.” This will add a SMS to your workflow.
How to customize this text message for your workflow:
- Click on “Send SMS” in your workflow.
- Fill in all properties for how you’ll be sending your SMS.
- Under “phone number property” - add both “mobile phone number” then drop in a comma, and “phone number.” (The comma is important. Be sure to add it!)
- For the “send from” - the best practice is to send your SMS message from “owner” instead of an inbox. This allows you to scale and send thousands of texts at once.
- Owner property: Drop in “Contact Owner.” (This is important. Your workflow will not run from an owner if you don’t say “Contact Owner” in the owner property.)
- Write your Launch Text message. For example: “Hey (FirstName), It’s Jeff from Salesmsg. Our biggest promotion of the year starts now! Get in on this first: (Link).

Pro Tips:
- Best practice: Keep your SMS messages to 160 characters whenever possible. (That helps you hold down the number of credits per message.)
- Using MMS? Remember all characters = 2 credits in the U.S. and Canada.
- To save on characters in your SMS, use Salesmsg’s link shortener to shorten your link.
- Keep in mind: The message composer does NOT count your characters inside HubSpot. That means you can accidentally copy and paste the same message multiple times. Or use more characters than you intend to—especially if you’re using emojis. Be sure to check the count!
- Introduce yourself in messages whenever possible. “Hi it’s Jeff from Salesmsg… etc.”
- Sending your first text to new leads? Click the “Add an opt-out message” to ensure your text message is compliant.
- Only send text messages to valid numbers: Click “PhoneChecker” to check all numbers.
✅ Add emails 1-4 and all delays from your email only branch 2 to SMS branch 1.
You can quickly add all the promo emails you have in your email only branch 2 into your SMS branch 1 for leads who asked to receive SMS + emails.
- In branch 2 of your workflow: Click the clone button under email 1.
- Clone this action and all following actions.
- You’ll see a “Place here” appear under the SMS branch 1 of your workflow. Click it. You should instantly see emails 1-4 and all delays from your email branch duplicated into your SMS branch.

✅ Last step: Add SMS 2 to branch 1 - This is your Last-Chance Text on the final day.
Add this second text message to your workflow:
- Inside your workflow, click the plus sign under the SMS branch. This will open your “Choose an Action” menu.
- On the “Choose an Action” menu, scroll down to Salesmsg SMS Texting & Calling. Open that menu.
- Click “Send SMS/MMS - Text Message.” This will add a SMS to your workflow.
Customize this text message for your workflow:
- Click on “Send SMS/MMS - Text Message” in your workflow.
- Fill in all properties for how you’ll be sending your SMS.
- Write your Launch Text message. For example: “Last day: Our biggest promotion of the year ends tonight. Seen this yet? (Link)

Pro Tips:
- Since it’s a promotional marketing message, click “add an opt-out message” to give your subscribers a chance to opt-out.
- Click “PhoneCheckr” to check all numbers before you send, to ensure they are all textable numbers.
Step #6 Review & Publish - Everything look good? Hit review & publish.

Why SMS Works for Promos
Promotions fail when people don’t see them. SMS ensures your best offers actually get noticed and acted on.
✅ Immediate visibility – A text cuts through email noise.
✅ Higher conversions – Leads are more likely to act when reminded directly.
✅ More sales – Two simple texts can drive urgency and boost revenue.
Want help setting this up? Try Salesmsg for free for 14 days and start running high-impact promotions today.
Related posts
.png)
.png)
.png)

Experience Seamless Business Texting & Calling
Get started today and see how Salesmsg can transform your business and bring you closer to your customers.


